저번 포스팅에서는 UIViewController Transition 를 다루는 방법을 살펴보았습니다.
이 포스팅은 "사용성 최대로 올려보자!"의 Series 중 일부입니다.
1. iOS 사용성 최대로 올려보자! (Part1) - PaintCode
2. iOS 사용성 최대로 올려보자! (Part2) - ShapeShifter
3. iOS 사용성 최대로 올려보자! (Part3) - UIView Interactive Animation
4. iOS 사용성 최대로 올려보자! (Part4) - UIViewController Non Interactive Transition
5. iOS 사용성 최대로 올려보자! (Part5) - Easing function
6. iOS 사용성 최대로 올려보자! (Final) - UIViewController Interactive Transition
여기까지 오시느라 고생 많으셨습니다.
그래서 잠시 쉬어가는 시간으로 Easing function 포스트를 준비하였습니다.
Easing function Cheat Sheet 를 통해 다양한 Animation Timing을 볼 수 있습니다.

Easing Functions Cheat Sheet
Easing functions specify the speed of animation to make the movement more natural. Real objects don’t just move at a constant speed, and do not start and stop in an instant. This page helps you choose the right easing function.
easings.net
우리가 직접 만들어 볼 수도 있겠죠?

cubic-bezier.com
Library Import Export Click on a curve to compare it with the current one. Tip: Right click on any library curve and select “Copy Link Address” to get a permalink to it which you can share with others
cubic-bezier.com
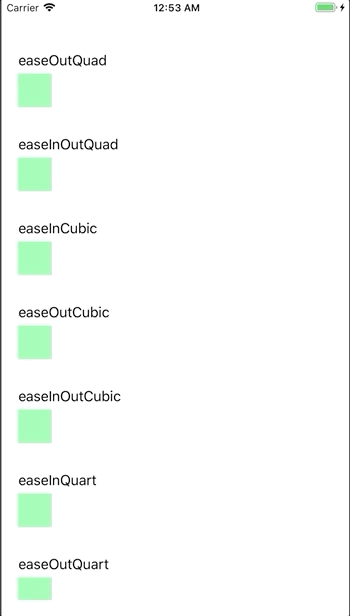
Easing function Cheat Sheet를 Swift Code로 옮겼습니다.
https://github.com/kimtaesu/EasingFunction/blob/master/Sources/EasingFunction.swift
kimtaesu/EasingFunction
Contribute to kimtaesu/EasingFunction development by creating an account on GitHub.
github.com
정말 노가ㄷ,,,,,,,
코드도 만들었으니 실행해 봅시다!
마무리
이제 사용성이 좋은 앱을 만들기 위해 다섯 발자국 걸었습니다.
앞으로 Serise를 다 읽으시고 경험하신다면 좋은 앱 개발자가 될 것입니다.
소중한 시간 내어서 읽어주셔서 감사합니다
'iOS' 카테고리의 다른 글
| RxCocoa Binder? ControlEvent? (0) | 2019.09.01 |
|---|---|
| iOS 사용성 최대로 올려보자! (Final) - UIViewController Interactive Transition (0) | 2019.08.20 |
| iOS 사용성 최대로 올려보자! (Part3) - UIView Interactive Animation (1) | 2019.08.19 |
| iOS 사용성 최대로 올려보자! (Part4) - UIViewController Non Interactive Transition (0) | 2019.08.18 |
| iOS 사용성 최대로 올려보자! (Part2) - ShapeShifter (0) | 2019.08.18 |


